You clicked the wrong “Download” button on a driver update site, didn’t you? Now your default search engine is “SafeSearch24,” your fan is spinning like a jet turbine while looking at a blank desktop, and you have pop-ups offering you “discounted” McAfee subscriptions every twelve seconds. I see this three times a week. The most annoying part isn’t the virus itself; it’s that most antivirus software won’t even flag it. They call these “PUPs” (Potentially Unwanted Programs) because, technically, you agreed to install them when you blindly clicked “Next” on that installer. I’m going to show you how to rip this garbage out by the roots, because simply dragging the app to the Recycle Bin does absolutely nothing.
Why “Full Scan” Is a Waste of Time
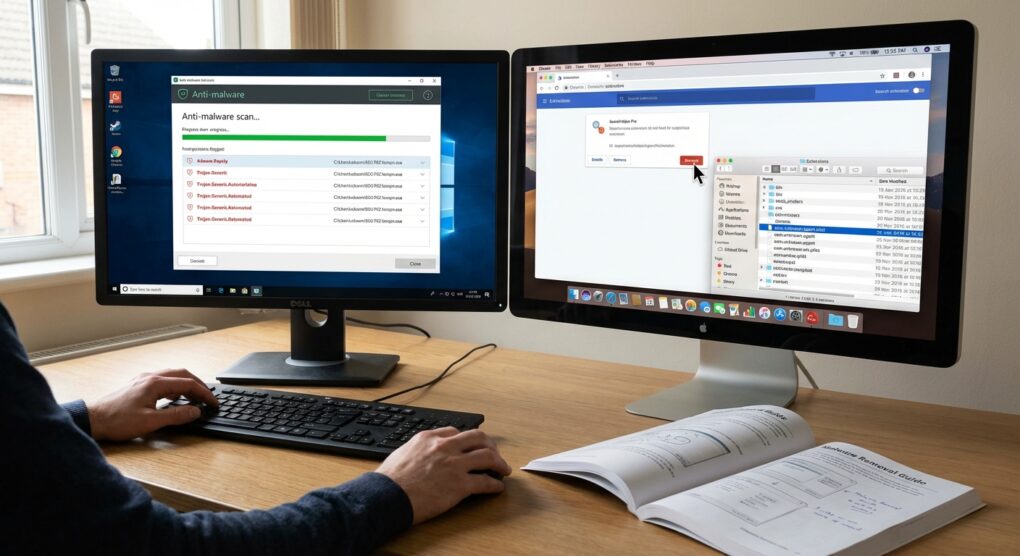
If you just open Windows Defender or your paid Norton subscription and hit “Full Scan,” you are wasting three hours. Most modern adware lives in the gray areas of your system: browser extensions, scheduled tasks, and temporary folders. Traditional antivirus looks for signature-based executables—actual viruses that destroy data. Adware doesn’t want to destroy your data; it wants to serve you ads. It behaves like legitimate software. To get rid of it, you have to stop treating it like a virus and start treating it like a parasite. You need to cut off its food supply (the internet), remove its hooks (browser extensions), and then poison it (specialized anti-malware tools).
Phase 1: The Prep (Don’t Skip This)
I learned this the hard way after chasing a crypto-miner around a client’s network for a whole afternoon. If the machine is online, the malware can phone home and download new variants of itself faster than you can delete them.
- Sever the Connection: Physically unplug the Ethernet cable or turn off the Wi-Fi. Do not just close the browser. You want the computer completely air-gapped.
- Boot into Safe Mode: On Windows, hold Shift while clicking Restart > Troubleshoot > Advanced Options > Startup Settings > Restart > Press 4. On a Mac with Apple Silicon, shut down, then hold the Power button until you see startup options, select your disk, hold Shift, and click “Continue in Safe Mode.” This prevents the malware from loading its persistence drivers.
Phase 2: The Browser Purge
90% of the “viruses” people bring to me are just malicious Chrome extensions. They are lightweight, they sync across devices, and they are incredibly annoying.
For Chrome / Edge / Brave
In Safe Mode, open your browser. It will look weird without hardware acceleration. That’s fine.
- Type
chrome://extensions(oredge://extensions) in the address bar. - Turn on Developer Mode in the top right corner. This reveals the ID of the extension.
- Look for anything you don’t recognize. Common culprits have names like “PDF Converter,” “Weather Check,” or generic “Shopping Assistant” tools.
- Do not just turn them off. Click Remove.
- Clear the Data: Go to Settings > Privacy and security > Clear browsing data. Select All time. Check “Cookies” and “Cached images.” This flushes the scripts they stored locally.
For Safari (Mac)
Safari extensions are more locked down, but they still happen.
- Go to Safari > Settings > Extensions.
- Uninstall anything you didn’t explicitly install yourself.
- Go to Safari > Settings > Search. Ensure your search engine hasn’t been changed to Yahoo or Bing (unless you actually use them, which I doubt).
Phase 3: The “Dirty” Tools
Now we use the heavy artillery. You can’t download these while in Safe Mode without internet, so ideally, you downloaded these to a USB drive on a clean computer beforehand. If you didn’t, boot back into normal mode with networking just long enough to grab them, then go back to Safe Mode.
Windows: Malwarebytes AdwCleaner
I don’t mean the full Malwarebytes suite (though that’s good). I mean AdwCleaner. It is a standalone executable that targets adware specifically. It’s aggressive and fast.
- Run adwcleaner.exe as Administrator.
- Click Scan Now. It usually takes less than 5 minutes.
- It will populate a list of “PUPs” and “Preinstalled Software.” Check everything.
- Click Quarantine. The machine will reboot.
Mac: Malwarebytes for Mac (Free Version)
Macs don’t get “viruses” often, but they get absolutely infested with “MacKeeper” style bloatware. Malwarebytes is the only tool I trust on macOS that doesn’t slow the system to a crawl.
- Install it, skip the premium trial (you don’t need real-time protection for a one-off cleaning).
- Run a scan.
- It will likely find “OSX.Genio” or “OSX.Bundlore.” These are the classic installers that bundle adware. Delete them all.
Phase 4: Checking Persistence (The Manual Hunt)
This is where the automated tools fail. If the malware created a scheduled task to re-download itself every Tuesday at 3 AM, AdwCleaner might miss it.
Windows Task Scheduler
I once cleared a machine three times in a row, only for the popup to return the next day. It turned out there was a hidden task in the scheduler.
- Press Windows + R, type
taskschd.msc, and hit Enter. - Click on Task Scheduler Library in the left pane.
- Look through the list in the middle. You are looking for tasks with random names like “ChromeUpdate_XJ9” or “SystemCheck_v2.”
- Click on a suspicious task and look at the Actions tab below. If it points to a file in
AppData\Local\Tempor executes a PowerShell script, it is malware. - Right-click and Delete it.
Windows Registry (Careful here)
Check the “Run” keys. This is where programs tell Windows to start them on boot.
- Open regedit.
- Navigate to
HKEY_CURRENT_USER\Software\Microsoft\Windows\CurrentVersion\Run. - Look for keys pointing to strange .exe files in your User folder. If you see something pointing to
C:\Users\You\AppData\Roaming\HelperTool\helper.exe, delete the key.
Mac LaunchAgents
On macOS, malware hides in the Library folders.
- Open Finder, press Command + Shift + G.
- Go to
~/Library/LaunchAgents. - Look for files named
com.suspicious.plistor anything related to “cleaner” apps. Delete them. - Repeat this for
/Library/LaunchDaemonsand/Library/LaunchAgents(the system-level folders).
Common Pitfalls
The “Browser Sync” Re-Infection
This is the most common failure point. You clean the computer, you reboot, and you open Chrome. You sign in to your Google account. Chrome Sync sees that you are missing your “PDF Converter” extension (which is synced to your account) and helpful re-installs it for you. The malware is back instantly. Before you start cleaning, sign out of your browser sync. Only sign back in after you have verified the machine is clean, and use the “Reset Sync” option in your Google/Firefox dashboard to wipe the bad data from the cloud.
The “System Restore” Loop
Some malware is smart enough to hide inside your System Restore points. If you clean the PC and then decide to “Roll back to a previous date” because things feel glitchy, you might just be rolling back to a time when the virus was active. Once you are 100% sure the machine is clean, you should delete all old System Restore points to ensure you don’t accidentally revive the infection later. Search for “Create a restore point,” go to Configure, and click Delete.
Fake “Download” Buttons
When you are downloading tools like Malwarebytes or AdwCleaner, ensure you are on the actual vendor site (malwarebytes.com). The top three results on Google are often ads for fake cleaners that are, ironically, malware themselves. I always check the URL bar to make sure I’m not on “malwarebytes-free-download.net” or some scam mirror.
Clean your browser sync data, nuke the temp folders, and never trust a “Update Flash Player” popup again.