That dreadful grinding noise. It’s distinct, isn’t it? Not a gentle hum, not even the roar of a fan working hard, but a coarse, insistent grinding, like tiny gears chewing on sand. My personal laptop, a reliable workhorse I’ve had for years, started doing it last month. It was intermittent at first, then became a constant, low-grade torture, especially when the machine was under any kind of load. The laptop got hotter, performance throttled, and frankly, it was just plain annoying to listen to.
You could try just blowing compressed air in through the vents, and sure, that might dislodge a dust bunny. But in my experience, a true grinding noise isn’t just surface-level dust. It points to something more substantial: a physical obstruction jammed into the fan blades, or more commonly, a failing bearing inside the fan motor itself. Compressed air won’t fix a failing bearing, and it might just push a solid obstruction further in. To properly address it, you need to go in. It’s a bit more involved, but it’s the only reliable way to bring peace back to your workstation.
The Fix: Opening Up and Replacing
Preparation: Gather Your Tools and Get Ready
This isn’t a job for the faint of heart or the overly aggressive. Patience is your best tool. Before you start, lay out everything you’ll need on a clean, well-lit surface.
- Small Phillips-head screwdrivers: You’ll likely need a PH0 or PH00. Some laptops also use Torx screws (T5 or T6 are common), so a small precision screwdriver set is a wise investment.
- Plastic spudger or guitar pick: Essential for gently prying open plastic clips without marring the case.
- Can of compressed air: For a thorough cleaning once inside.
- Lint-free cloths and isopropyl alcohol (>90%): If you end up replacing the heatsink assembly, you’ll need to clean off old thermal paste.
- New thermal paste: Only needed if you’re replacing the heatsink or separating it from the CPU/GPU. A small tube will do.
- A small container or magnetic mat: For organizing screws. Trust me on this one.
First things first: Always disconnect the power adapter and, if removable, take out the battery. If it’s an internal battery, you’ll need to disconnect its cable from the motherboard once you open the laptop. Press and hold the laptop’s power button for about 15 seconds after disconnecting everything to discharge any residual power. Safety first, always.
Step-by-Step Disassembly
- Remove the bottom panel:
- Flip the laptop over. You’ll see numerous screws securing the bottom cover. Carefully remove all of them. Pay attention to screw lengths and types; sometimes they vary. I like to arrange them in the pattern they came from on a piece of paper or my magnetic mat, so I know exactly where each one goes later.
- Once the screws are out, use your plastic spudger to gently pry along the seam where the bottom panel meets the main chassis. Work your way around slowly, releasing the plastic clips. Don’t force it; if it’s not coming, check for a hidden screw under a rubber foot or label.
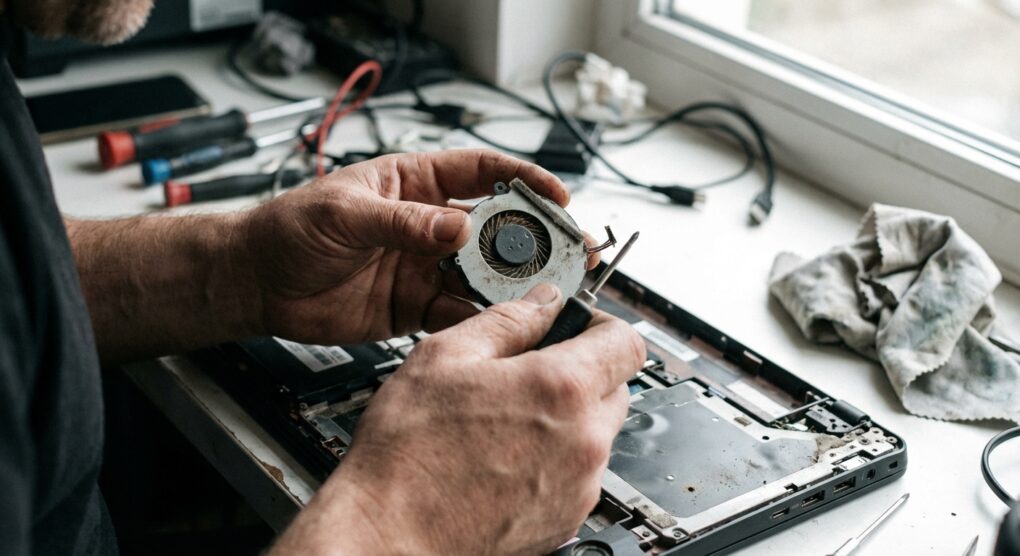
- Locate and disconnect the fan:
- With the bottom panel off, you should see the fan(s), often part of a larger heatsink assembly that connects to the CPU and GPU.
- If your battery is internal, locate its connector on the motherboard and gently disconnect it. This is a critical step to prevent accidental shorts.
- The fan will have a small cable connecting it to the motherboard. Carefully pull the connector straight up or away (depending on the type) to disconnect it. These can be fragile.
- Next, unscrew the fan itself. It might be held by two or three small screws. If it’s part of the heatsink, you’ll need to remove the entire heatsink assembly, which means unscrewing a pattern of screws around the CPU/GPU die. Note the numbering on the heatsink screws if provided, and remove them in reverse order (e.g., 4-3-2-1) to ensure even pressure release.
- Inspect and clean (or replace):
- Once the fan is out, examine it closely. Are there any physical obstructions like pet hair, lint, or tiny bits of paper jammed into the blades or the casing? Remove anything you find.
- Spin the fan manually with your finger. Does it feel gritty? Does it wobble excessively? If so, the bearing is likely shot, and no amount of cleaning will fix a grinding noise caused by a worn bearing. A replacement is necessary.
- If it’s just dusty and spins freely, use your compressed air to blast out all the dust from the fan blades and the heatsink fins. A small mistake I made years ago: The first time I did this, I forgot to hold the fan blades when blasting it with compressed air. The fan spun wildly, and I suspect I might have accelerated wear on the bearing. Always hold the fan blades gently to prevent over-spinning while cleaning.
- If you’re replacing the fan or the entire heatsink assembly, make a note of the part number on the old fan. This is crucial for ordering the correct replacement.
- Reassembly (and thermal paste application if needed):
- If you replaced the entire heatsink assembly, you’ll need to clean off the old thermal paste from the CPU and GPU dies using isopropyl alcohol and a lint-free cloth. Apply a small amount of new thermal paste—a pea-sized dot or a thin line—to the center of the CPU/GPU die. Don’t overdo it.
- Place the new fan/heatsink assembly into position. If it’s a heatsink, screw it down in the numbered sequence (e.g., 1-2-3-4) to ensure even pressure.
- Reconnect the fan’s power cable to the motherboard. Double-check this connection; it’s easy to miss.
- Reconnect the internal battery cable to the motherboard.
- Test before final closure:
- Before putting the bottom panel back on and screwing everything down, plug in the power adapter (do not put the external battery back in yet if you removed one).
- Boot the laptop. Listen carefully. Is the fan quiet? Does it spin up properly? Check your operating system’s fan control utility or the BIOS/UEFI settings if you want to monitor temperatures and fan speeds.
- If all sounds good, shut down the laptop, disconnect power, and proceed with reassembling the bottom panel, carefully snapping it back into place and replacing all the screws.
Things people often get wrong
Beyond my mistake with the compressed air, I’ve seen or made these errors myself:
- Stripping screws: Using the wrong size or type of screwdriver. Always make sure the screwdriver bit fits snugly. If it feels like it’s slipping, stop.
- Losing screws: Not organizing them properly. Those little guys love to vanish into thin air. A magnetic tray or masking tape on a piece of paper with screw locations drawn out saves a lot of headaches.
- Forgetting to disconnect the battery: This is probably the most common critical error. Working on live components is an express ticket to short circuits and damaged parts.
- Forcing plastic clips: Laptop cases are plastic, and those clips are designed to snap. If it’s not coming apart easily, something is still holding it. Recheck for screws or pry more gently.
- Incorrect thermal paste application: Too much paste can actually insulate rather than conduct heat, and too little won’t cover the entire die. The “rice grain” or “pea-sized dot” method is usually sufficient for most CPUs.
- Ordering the wrong replacement fan: There are often subtle variations. Always match the part number from your old fan, and compare images carefully.
Tackling a noisy fan head-on often saves a machine from an early grave and restores its quiet, reliable operation.